Definition
There are many ways of illustrating hands and deals. A common approach is to use a flip chart or Data Projector. For most lesson series, a better method is to have the students, directed by the teacher, put playing cards face-up on the table to demonstrate hands and deals. This is referred to as the Cards-on-the-Table method. An effective way to illustrate the cards is to use the cards themselves.
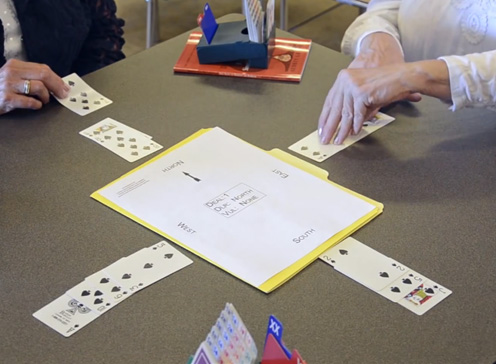
Video Illustration of Cards on the Table
The Challenge
To implement this method, the teacher requires a special skill set because instructions have to be given to the students in a particular way. Otherwise, it’s possible to lose class control.
The method for delivering instructions is outlined in detail, and you can download them under Scripts in the Download Section. You’ll know when you come up with wording that is more appropriate to your class, but a lot of commonly made mistakes can be avoided by using the scripts. The challenge is to not be afraid to give what might sound like over simplistic, almost insulting, directions.
Another challenge is to avoid Table Clutter. When you read the Table Setup section, you’ll see that there is a minimalistic approach to what is on the table. Anything extra is litter, and table untidiness interferes with the time it takes to learn the game.
Role of the Student
Students have to buy into the cards-on-the-table method, and they will. They’ll experience that having playing cards displayed on the table to illustrate concepts of bidding, play and defense is an efficient, effective way to learn the game.
A result of this method is that the students face each other rather than the front of the room and the teacher. There will be opportunities to talk among themselves on a regular basis. Again they have to buy into this --- and they do. It’s rare that they will use the short intervals during the class, that they’re given to talk with other students about a particular part of the game, to discuss anything else. They appreciate this chance to improve their retention of what is being presented.
Advantages
- Students learn more quickly.
- There is an increase in positive class energy; students feel empowered.
- Play of the hand and defense can be taught effectively.
Table Setup
The teacher has to deliberately control table clutter. The adage everything in its place works. The Bidding Boxes are at the edge of the table, playing cards are stored in the pocket in the front of the Bidding Box. The Better Bridge texts are sized to fit under the Bidding Box. The Deal Records go in a folder in the middle of the table.
Beware of Table Clutter
Even with clear-cut instructions, there will be times when, for example, one player puts the ♠A-x-x face up on the table, and leaves the remaining ten spades also face up, creating table clutter! Or, a player could throw the suit carelessly on the table. We can simply say:
"If there are any cards face up on the table other than the 13 cards, or if any suit is not arranged so that it can be seen easily, could any player at the table adjust the cards."
Although this could sound intrusive because one player might handle another player’s cards, it is usually not seen as this. The alternative is to be at the mercy of any player who, for whatever reason, didn’t hear the instructions or can’t arrange the cards in a neat manner. In practice, the four players are being directed - almost being given permission - to work with each other, to work as a team.
The teacher needs to know how to direct the students to put thirteen cards face up on the table. Although this seems like such an easy thing to do, it requires practice and skill. The price is high if we are not detailed enough and lose control.
Bidding Boxes
The Bidding Boxes are crucial for high-quality bridge lessons, and not only for the obvious reason, which is to make the auction clear. They also offer an essential, yet unexpected advantage for the bridge teacher. There is a space at the front of the Bidding Box that can accommodate thirteen playing cards. This is the ideal place for students to store cards when they are not in use.
Student Texts
The Better Bridge Student Texts are produced with the student and the teacher in mind. They’re comprehensive, well-researched, and straightforward to read.
They are also the right size to be conveniently stored on the table. Instead of using coils to keep them flat and easy to read, the texts are auto bound. Without the coils, they sit flat on the table and the Bidding Box can be put, easily, on top of the text. If the Bidding Box is attached to the side of the table, the text goes beside the Box.
Deal Records
Carefully constructed deals drive the lessons. Since bridge is a trick-taking game, it’s important to see how the bidding, defense, and play tips impact the potential of a deal to take tricks.
Students want to play, so it meets their expectations when the lessons are driven by high quality deals. The first premise is that the teacher has to be able to efficiently guide the students to distribute a deal. This can be done in several ways. Traditionally teachers used Boards. Coded Cards became popular. Now Deal Records allow for maximum flexibility.
To use the Deal Records to best advantage, teachers have to be familiar with the section on Card Management. This section, with this method, should not be an optional read because being aware of the subtle pitfalls can be vital to the success of a class.
Giving Instructions
To get four people at a table to construct a hand with thirteen cards, face up, in front of one direction, use an age-old maxim: “Tell them what you are going to tell them, tell them, and tell them what you’ve told them.” Even some experienced players need to be reminded about ‘dummy style.’ Otherwise, they’ll put the hand right-side up to themselves so they can see the hand but it is upside down to the other three players.
A single hand is constructed in a variety of lesson situations. Sometimes it will be an isolated hand to illustrate a bidding point, other times it will be within the context of a full deal. Whatever the context, following these guidelines will help ensure the kind of orderly environment which best facilitates learning. In the following example, we are constructing a single hand in front of North.
The Microphone
To keep control of the class, a microphone is essential. Even teachers with strong vocal cords would do better using the microphone. It’s easy for the class to get out of control when the method involves letting them talk and then bringing them back to the listening position. Even if you are known for having a strong voice that your students can hear, use a microphone. See what happens when you use the microphone in smaller classes, and observe the result after you’ve tried it for several lessons. In other words, don’t reject the use of a microphone, for whatever reason, before you’ve tried it.
Tell Them What You’re Going to Tell Them
Give instructions that set the objective.
"We’re going to construct a hand in front of North; face up, dummy style, with the cards in columns. The high cards will be at the edge of the table, just as if this hand is the dummy. If the hand is in front of us, dummy style, it will be upside down to us but right side up to the other three players. A good trade. There will be 13 cards face up on the table. All other cards will be face down or placed in our Bidding Box, not in our hands. No one at the table will need to hold any cards. We’re going to look at interesting bidding ideas, and we’ll be able to see the cards more easily if they’re right in front of us on the table rather than on a flip chart."
Tell Them
There are several ways we could, for example, ask the player with spades to put the ♠A-7-6 face up on the table. We could simply say, “Put the Ace, Seven, and Six of spades on the table.” A statement like this is likely to lead to confusion. First of all, everyone has to listen to the numbers before the suit is given. This spends class energy in an unproductive manner. There is no information where or how the cards are to be placed. Better instructions would be:
"The person with the spade suit will be first to put cards face up on the table in front of North. There are going to be three spades in the hand. The spades are the Ace and two low spades. Put them in a column, face up, in front of North. Put the remaining ten spades in the bidding box or face down on the table. Only three cards are face up on the table, the ♠A and two low spades. Are there any questions so far?"
The instructions continue in a similar manner:
"The player with hearts will go next. Put four hearts in front of North, face up, beside the spades. There are two high cards and two low cards. Put the ♥K, ♥Q and two low hearts in front of North. There should now be seven cards face up on the table: three spades and four hearts. Are there any questions?"
Although this might seem far too tedious and time consuming, experience has shown that the opposite is true; it saves time. If we give the instructions only once, the hands are unlikely to be accurately constructed at many tables and there will be questions! “What were the spades?” “We only have twelve cards, could you read the hand again?” “How many diamonds were there?” “Could you come over here and tell us the hand again.” It’s very easy to lose control of the class if we’re not specific when giving directions.
Tell Them What You’ve Told Them
Once the hand has been constructed, review it briefly with the entire class. The instructions could be:
"There should now be thirteen cards face up on the table. In spades there are three cards, the ♠A and two low spades. In hearts there are four cards, the ♥K, ♥Q and two low hearts. In diamonds there are four low cards. Finally, there should be two low clubs."
Now there are unlikely to be any questions. If we’re not working with an assistant, however, we should have a hand made up ahead of time, in a board in the North pocket with the other directions sorted into suits. In the event a table still doesn’t have the correct hand, we can take away the deck of cards that the students were using and quickly replace them with the board.
Once we carefully give instructions for the first hand, there are few problems moving cards to get to another hand pattern. The participants are ready to be an active part of constructing a hand.
Get the Cards into Suits
From the full deck, each player takes one suit. There are various ways to get the deck divided into four suits. As with constructing a single hand, getting the cards into suits is a recurring activity. Whatever the context for dividing a deck into suits, the following applies.
The Teacher Suits the Deck
The instructor can have the deck already sorted into suits and put each suit in front of the player's bidding box, in a duplicate board, or in front of each player. The players take the cards out of the pocket in front of them, or pick up the cards on the table, and are ready to construct the hand.
Even then, the instructions have to be clear. If we’re using the model of having the cards suited ahead of time, here is the detail necessary to keep control of the class:
"Each player is going to have one suit. There are thirteen cards in one suit in the front of the bidding box, or in the pocket of the duplicate board (or on the table) in front of you. Take these thirteen cards out of the pocket (pick up the cards). One player will now have all the spades; one player all the hearts; one player all the diamonds; and one player all the clubs."
Although this much detail might seem unnecessary, experience has shown that the students are appreciative of the time saved in class when specific instructions are given on the front end. What might happen if we’re not this specific? A player might shuffle the cards and start to deal them out.
The Students Divide a Deck into Suits
Another way to have the cards divided into suits is to start by having one player deal the cards. (Or each player may already hold thirteen cards from an earlier deal.) The instructions would then be as follows:
"North, deal the cards so that each player has thirteen cards. Turn the cards face up on the table, in columns, dummy style. There will be 52 cards face up on the table. North, keep your hand intact. Now East, South, and West, put your spades on top of North’s spades, your hearts on top of North’s hearts, your diamonds on top of North’s diamonds, and your clubs on top of North’s clubs.
East, South, and West now take one suit from the North hand. North, pick up the remaining cards. You should each now be holding thirteen cards in one suit. One player is going to have all of the spades, one player all of the hearts, one player all of the diamonds, and one player all of the clubs."
Storing the Cards
As mentioned above, the Bidding Boxes are an excellent place to store the playing cards when they are not being used.
Using the Deal Records
Five Steps to Guide the Students to Distribute a Deal
Step One
“Let’s go through the mechanics of distributing a deal. There are five steps. The First Step is to take the cards that are in the middle of your table and spread them face-up on the table. Each player takes one suit.
One player takes the spades, one player the hearts, one player the diamonds and one player the clubs.
Start to do that now. Each player takes one suit.
When you have the thirteen cards in your suit, put the cards in the front, not the back of the Bidding Box. They’ll fit.
That’s the first of five steps. There are no cards on the table. The suits are in the front of the Bidding Box.”
You could have the cards divided into suits ahead of time. This should work; however, students do tend to shuffle the cards. You could also put one suit in the front of each Bidding Box.
Step Two
“The second step has two parts. First North, or any player at the table, opens the folder that is labelled Deal Records. Take out Deal One. Close the folder. Put Deal One on top of the folder turned to the busy side...the side with numbers and letters.
It doesn’t matter where you point North. The key is to make sure North is in the same direction for each of the deals.
Each player --- look at the hand opposite you. If you’re North look at the South hand. If you’re South look at the North hand. Are you doing this? If you’re East look at the West hand. If you’re West look at the East hand.
This should be irritating for you for two reasons: the hand you’re trying to see is upside down; the hand does not belong to you so you’re looking at your partner’s cards.
The moral is: don’t do this again. Only look at the hand in front of you."
Step Three
“Take your suit out of the front of the Bidding Box. Look at the hand in front of you. Take the cards from your suit that the hand in front of you needs.
Then pass the rest of the cards to the left.
Take the cards that you need, pass the rest to the left.
This is the third step among five steps."
Step Four
“Pick up the cards from the table. There are no cards on the table. Each player is holding the thirteen cards that represent the hand in front of each player. Check to make sure you have the right hand."
Step Five
“North, turn over the Deal Record in front of you to the Calm Side, the side with more open space.
Put the cards you’re holding in the front of your Bidding Box. Let’s talk."
At this point the lesson is introduced. For example, in Five Steps to Simply the Endplay, the Teacher’s Notes suggest that at this point the following information is given to the class.
“We’re going to look at an idea that has fascinated bridge players, of all experience and skill levels, for decades. This idea is that there is a way during the play of a deal to force the opponents to help you. There is a way to succeed even in the face of bad luck.
Let’s take a closer look at one deal. North and South take your thirteen cards from the front of the Bidding Box and put them face-up on the table. West, put only the DK on the table. Put the other 12 cards in the front of the Bidding Box.
Let’s talk about this deal."
Using the Coded Cards
There are thirty-two deals in each Better Bridge textbook. Four are at the end of each lesson. The deals are used to show the bidding concepts in the context of an entire deal, along with some play and defense concepts. An additional sixteen deals are at the back of the book. There are Color-Coded Cards that accompany some of the books (those that don't have coded cards have deal records). To distribute a deal, give the students the following information:
"We’re going to play the first deal, Deal #1. The first step is to put the Color-Coded directional guide card (North/South/East/West) in the middle of the table. North is shaded red, East is blue, South is yellow, and West is green.
Now look at the back of one of the cards. The numbers are from 1 to 32. Arrange your cards so that #1 is in the upper left-hand corner. We’re going to distribute Deal #1.
Deal #1 will be shaded one of four colors: red, blue, yellow, or green. If a card has Deal #1 shaded red, put it face down in front of North, in one pile. If Deal #1 is shaded blue, put the card face down in front of East. If Deal #1 is shaded yellow, put the card face down in front of South. If Deal #1 is shaded green put the card face down in front of West.
After the cards are distributed, each player should have thirteen cards. If we’re North, all thirteen cards for Deal #1 will be shaded red. North’s numbers will also be underlined. That indicates that North is the dealer on Deal #1. East will have 13 cards in which Deal #1 is shaded blue; South will have Deal #1 shaded yellow; West will have Deal #1 shaded green.
Bid and play Deal #1. North is the dealer. You have 7½ minutes to play as many cards as you can.
If you finish before that time, turn all four hands face up, dummy style, and discuss the deal with the others at your table. You can consider the best contract for both sides and how the auction should go."
52 Cards Face Up On The Table
After the deal has been played all fifty-two cards are placed face up on the table. There is a caution to using the cards to illustrate bidding concepts when all the cards are face up. The cards have to be visible for all of the players: neatly arranged, in columns, dummy style. To achieve this, instructions have to be detailed. The same techniques are used. The teacher tells the class what will happen:
"We’re going to have 52 cards face up on the table so that we can talk about the bidding and play on this deal. So that all the players at the table can see the cards, were going to place the hands in front of each player, dummy style: in columns with the high cards about three inches in from the edge of the table. Your hand will be ‘upside down’ but you will be able to see the other three hands, which are ‘right side up’; it’s a good trade."
Then we tell them:
"Put your cards face up on the table, dummy style."
Finally, we tell them what we’ve told them:
"There should be fifty-two cards neatly turned face up on the table. Each hand should be dummy style in columns. If you see a card that is face down on the table, even if it is in front of another player, turn it face up. If any hand is difficult to see, any player at the table can adjust it."
In the Manual, all this is covered with an instruction such as:
"It’s time to look at the deal so, even if you haven’t completed the play, turn your hand face up and arrange it dummy style in front of you.
All 52 cards should be face up on the table, arranged neatly in columns, dummy style, in front of each player."
Discussing The Deal
When all fifty-two cards are face up on the table, the bidding and play are discussed. During the bidding conversation, the key is to focus the players’ attention on the appropriate hand. In the Manual, directions to the class are in boxes:
Some sections on play instruct the students to have only the lead and two hands face up on the table, and to arrange the suits so that they face each other. Here’s an example for Deal #1:
After the play in one direction is discussed, the play in the other direction might be discussed. For example:
East and West, turn your hands face down. North, keep the order of your suits intact. South, place your suits, dummy style, opposite North’s suits: spades opposite spades; hearts opposite hearts; etc. East, lead the ♦K. Only 27 cards are face up on the table … the North and South hands and East’s lead. Focus on the North-South hands."
|
||
|
| |
|
Card-By-Card
A unique feature of the lesson plans is a card-by-card description of how the hand is to be played. The students are very enthusiastic about ‘watching’ a hand being played. This is a time for clear instructions. We want to let the students know what is going to happen.
"We’re going to play the cards one at a time. Take the guide card and push it toward East, who will be the dummy on this hand. Who is on lead, if the declarer is West? (North)"
The diagram for the card-by-card looks like this:
The key is to say the direction first and then the card played. For example:
North, ♠Q. East, ♠3. South, ♠2. West, ♠A. Who won the first trick? (West). Turn down the first trick. Who’s on lead? (West). West plays the ♦4 to trick two…
Thirteen cards in a single suit can be used to illustrate a play point, such as how to take sure tricks or how to use promotion, length, or the finesse to develop the tricks needed to make the contract. Usually this pattern develops from having 27 or 52 cards face up on the table. To move to a single suit face up, the following instructions could be given:
"Turn your hearts, diamonds, and clubs face down. Leave the spades face up. There should now be 13 cards only face up on the table, all of the spades. All other suits are turned face down."